If you’ve used Power Query for any length of time, you almost certainly have joined tables together. Joins are a common operation—and one with various details and options to be explored. Let’s take a few posts to look into some of these interesting areas!
Our focus will be topics specific to how Power Query implements joins, as well as some lesser-known general concepts. We’ll assume that you already have a grasp of commonly-known, non-Power Query specific join basics, like the difference between left, right, inner and full joins. (If such fundamentals are a bit fuzzy, when you bump into a head-scratching part in this series, it might be good to do an online search as a refresher.)
Series Index
- Deep Dive Into Joins (Part 1): Join vs. Nested Join [this post]
- Deep Dive Into Joins (Part 2): Not So Common, But Real-World Useful
First up: Power Query’s Two Main Approaches to Performing Joins
Maybe you’ve used query editor to “Merge queries.” Perhaps you’ve hand-crafted the equivalent in M code. In either case, the code that’s created invokes Table.NestedJoin. But nested joins aren’t the only option for joining data in Power Query. The main alternative is the lesser-known Table.Join.
What are some of the differences between these two functions?
Row Multiplication
With Table.Join, for standard joins (left, right, inner and full joins), rows are paired with matching rows from the other side of the join (whether this occurs just from the left-side table to the right-side table, or just right-to-left, or both, depends on the join kind). This pairing of rows can result in row multiplication, where a row from one side of the join is repeated multiple times because it joins to multiple rows on the other side of the join. (Example: If left row A joins to right rows 1 and 2, then the join’s output will include two rows for A: one for A paired with 1, and another for A paired with 2. In a sense, row A was multiplied so that it could be paired twice—once with right row 1 and once with right row 2.)
This behavior is what would occur if you wrote the equivalent join in SQL (e.g. SELECT * FROM SomeTable s LEFT JOIN OtherTime o ON …).

On the other hand, Table.NestedJoin does not, by itself, multiply rows. Each row from the left table that should be included in the join’s output is included exactly one time, regardless of how many rows it pairs with from the right table. Instead of multiplying rows, the joined-to rows are included in a nested table that is placed in a new column which is added to the table that’s output. If, based on the join kind, rows from the right should be returned when they don’t pair with a left row, an additional row is included in the output which has all columns from the left table set to null; only the row’s nested join column will contain a value—a nested table containing the non-joining rows from the right.
A nested join’s output can be expanded (unnested), either by clicking in the UI, or by writing the equivalent in code (Table.ExpandTableColumn). A nested join that is expanded will contain the same number of rows as a non-nested join. So, with Table.NestedJoin, expanding requires a second step (Table.ExpandTableColumn), and row multiplication (if any) won’t occur until that second step; while with Table.Join, expansion, along with any related row multiplication, happens automatically.
In short:
Table.Join=Table.NestedJoin+Table.ExpandTableColumn= SQL JOIN
If you want a traditional join experience, both Table.Join or Table.NestedJoin + Table.ExpandTableColumn are options. Neither is per se better than the other; the choice of which to use is a matter of preference or convenience.
Differences of Preference or Convenience
Duplicate Column Names
With Table.Join, the table that’s output normally* includes all columns from both the left and right tables. If there are same-named columns in both tables, a rename will need to be applied prior to Table.Join to avoid an “Expression.Error: A join operation cannot result in a table with duplicate column names.”
(*The exception to “normally includes all columns” is in the case of an inner join where same-named columns are joined together. In this narrow case, since a same-named column from the left table is guaranteed to contain the exact same data as the same-named column from the right table, Table.Join automatically excludes one of the two same-named columns from its output. Example: If left’s column ID is paired with right’s column ID in an inner join, Table.Join will only return one column ID.)
As the requirement that column names be unique applies to all tables, the columns output by Table.NestedJoin + Table.ExpandTableColumn also must have unique names. However, with nested join + expand, a separate rename step isn’t always required, as Table.ExpandTableColumn can apply renames to columns from the right table when it does its unnesting.
Both examples below achieve the same effect. The first, which uses Table.Join, renames before the join; the second, which uses Table.NestedJoin + Table.ExpandTableColumn, renames as part of the expand.
let
  RightRenamed = Table.RenameColumns(RightTable, {{"Value", "ValueFromRight"}}),
  Join = Table.Join(LeftTable, {"LeftKeyColumn"}, RightRenamed , {"RightKeyColumn"}, JoinKind.LeftOuter)
in
  Join
let
  Join = Table.NestedJoin(LeftTable, {"LeftKeyColumn"}, RightTable, {"RightKeyColumn"}, "Nested", JoinKind.LeftOuter),
  Expand = Table.ExpandTableColumn(Join, "Nested", {"Value"}, {"ValueFromRight"})
in
  Expand
A slight difference between the two approaches emerges if it is desirable to also rename columns from the left table. In that case, the rename in rename + join (first example) could also perform those renames. In contrast, in the nested join + expand (second example), the expand can only rename columns from the right table, so a separate rename step would be need to be added—resulting in slightly more complex code.
Selecting Columns
Similarly, there are slight differences between the approaches when choosing which columns to include from the right table. Table.Join always includes all columns, with the singular exception previously noted. If only a subset of columns is desired, an additional step is needed to narrow down the column list. On the other hand, with nested join + expand, the expand always requires specifying the columns desired—making an extra step unnecessary.
For example, including all columns from the right table:
let
  Join = Table.Join(LeftTable, {"LeftKeyColumn"}, RightTable , {"RightKeyColumn"}, JoinKind.LeftOuter)
in
  Join
let
  Join = Table.NestedJoin(LeftTable, {"LeftKeyColumn"}, RightTable, {"RightKeyColumn"}, "Nested", JoinKind.LeftOuter),
  Expand = Table.ExpandTableColumn(Join, "Nested", {"RightKeyColumn", "SomeColumnFromRight" /* ... list other columns from right table—or, in place of the hard-coded list, do Table.ColumnNames(RightTable)*/})
in
  Expand
Or including just some columns from the right table:
let
  Join = Table.Join(LeftTable, {"LeftKeyColumn"}, RightTable , {"RightKeyColumn"}, JoinKind.LeftOuter),
  SelectColumns = Table.SelectColumns(Join , {"LeftKeyColumn", "SomeColumnFromLeft", "RightKeyColumn", "SomeColumnFromRight"}), // could instead use Table.RemoveColumns, listing the columns *not* to keep
in
  SelectColumns
let
  Join = Table.NestedJoin(LeftTable, {"LeftKeyColumn"}, RightTable, {"RightKeyColumn"}, "Nested", JoinKind.LeftOuter),
  Expand = Table.ExpandTableColumn(Join, "Nested", {"RightKeyColumn", "SomeColumnFromRight"})
in
  Expand
Again, slight differences at the syntax level. Maybe sometimes one approach has a slight edge over the other due to its simplicity.
When the need is for a traditional join, whether to use Table.Join or Table.NestedJoin + Table.ExpandTableColumn is a matter of preference and convenience (like perhaps favoring one approach over the other when it results in slightly cleaner code). Functionally, both get the job done; neither is inherently better than the other for normal, expanded joins.
Nested, Not Expanded
The big difference between Table.Join and Table.NestedJoin comes when you don’t want the rows from the right table to be expanded. With Table.NestedJoin, you can skip the expand and instead directly work with the nested table. This isn’t possible with Table.Join because it automatically expands rows.
For example, imagine a nested join from table customers to table orders. Instead of expanding orders, you could add a new column to the nested join’s (unexpected) output that simply reports the total of orders for each customer row, computing this aggregate by reading data from the unexpanded nested column.
let
  Join = Table.NestedJoin(Customers, {"CustomerID"}, Orders, {"CustomerID"}, "Orders", JoinKind.LeftOuter),
  AddOrderTotal = Table.AddColumn(Join, "OrderTotal", each List.Sum([Orders][Total]))
in
  AddOrderTotal
In fact, computing aggregates on a nested table column is a common-enough scenario that Power Query provides Table.AggregateTableColumn, a function specifically for this purpose. A single invocation of this function can compute multiple aggregates, which can each be based on a different column in the nested table (below computes three separate aggregates using columns Quantity, OrderId and Total, respectively, from nested table Orders), each of which will be output in a separate column (columns TotalQuantity, OrderCount and AverageOrderColumn, respectively).
let
  Join = Table.NestedJoin(Customers, {"CustomerID"}, Orders, {"CustomerID"}, "Orders", JoinKind.LeftOuter),
  ComputeAggregates = Table.AggregateTableColumn(Join,
	"Orders",
	{
        {"Quantity", List.Sum, "TotalQuantity"},
        {"OrderId", List.Count, "OrderCount"},
        {"Total", List.Average, "AverageOrderTotal"}
    }
  )
in
  ComputeAggregates
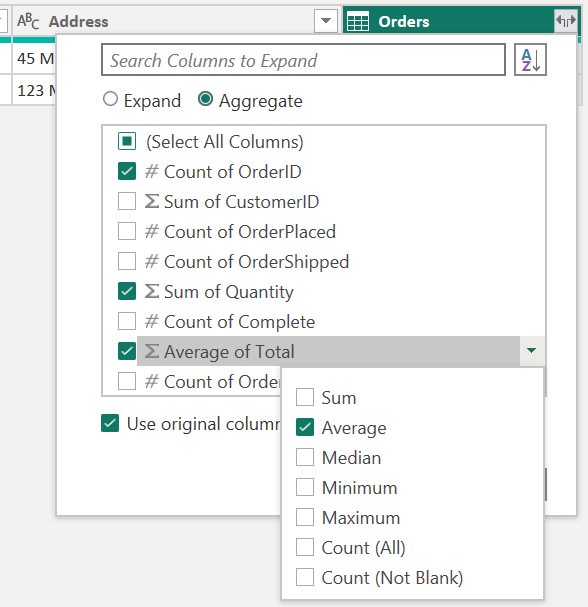
(Similar code using Table.AggregateTableColumn can be generated in Query Editor by clicking the expand column icon, then changing the selection from “Expand” to “Aggregate”, then selected the desired aggregates.)
Jumping back to the nested table column, since it contains, well, a table, you can work with it just like any other table. You’re not limited to computing simple aggregates or using Table.AggregateTableColumn. Instead, you can write your own code that is more complex. For example, what if we want to add an AverageOfLast3Orders column to the customers table?
let
  Join = Table.NestedJoin(Customers, {"CustomerID"}, Orders, {"CustomerID"}, "Orders", JoinKind.LeftOuter),
  AddAverageOfLast3Orders = Table.AddColumn(
    Join,
    "AverageOfLast3Orders",
    each List.Average(
      Table.FirstN(
        Table.Sort([Orders], {"Date", Order.Descending}),
        3
      )[Total]
    )
  )
in
  AddAverageOfLast3Orders
The code defining the new column above sorts the nested table, selects the rows corresponding with the three most recent orders, drills into their OrderTotal column, then averages that column across the three orders. (One reason to learn to write M code by hand is to be able to create and read expressions like the above—the GUI query editor tools don’t provide a convenient way to click to build things like this at present. Those who know M have an advantage here.)
The ability to work with the unexpended nested tables is powerful. When those capabilities are needed, Table.NestedJoin shines.
The Other Join Methods
Astute students of Power Query’s standard library may note that it also contains Table.AddJoinColumn, which we haven’t mentioned. Table.AddJoinColumn is equivalent to Table.NestedJoin, but without allowing the latter’s optional arguments to be specified. I’m not sure why it exists; it seems rarely used. For standardization’s sake, I’d suggest preferring the more flexible Table.NestedJoin over Table.AddJoinColumn.
Power Query also includes a couple fuzzy-join methods (Table.FuzzyJoin and Table.FuzzyNestedJoin). These are quite a bit different than the join methods we’ve discussed here, so we’ll leave them for another time.